Gluten Free, Garlic Spaghetti Squash

squash
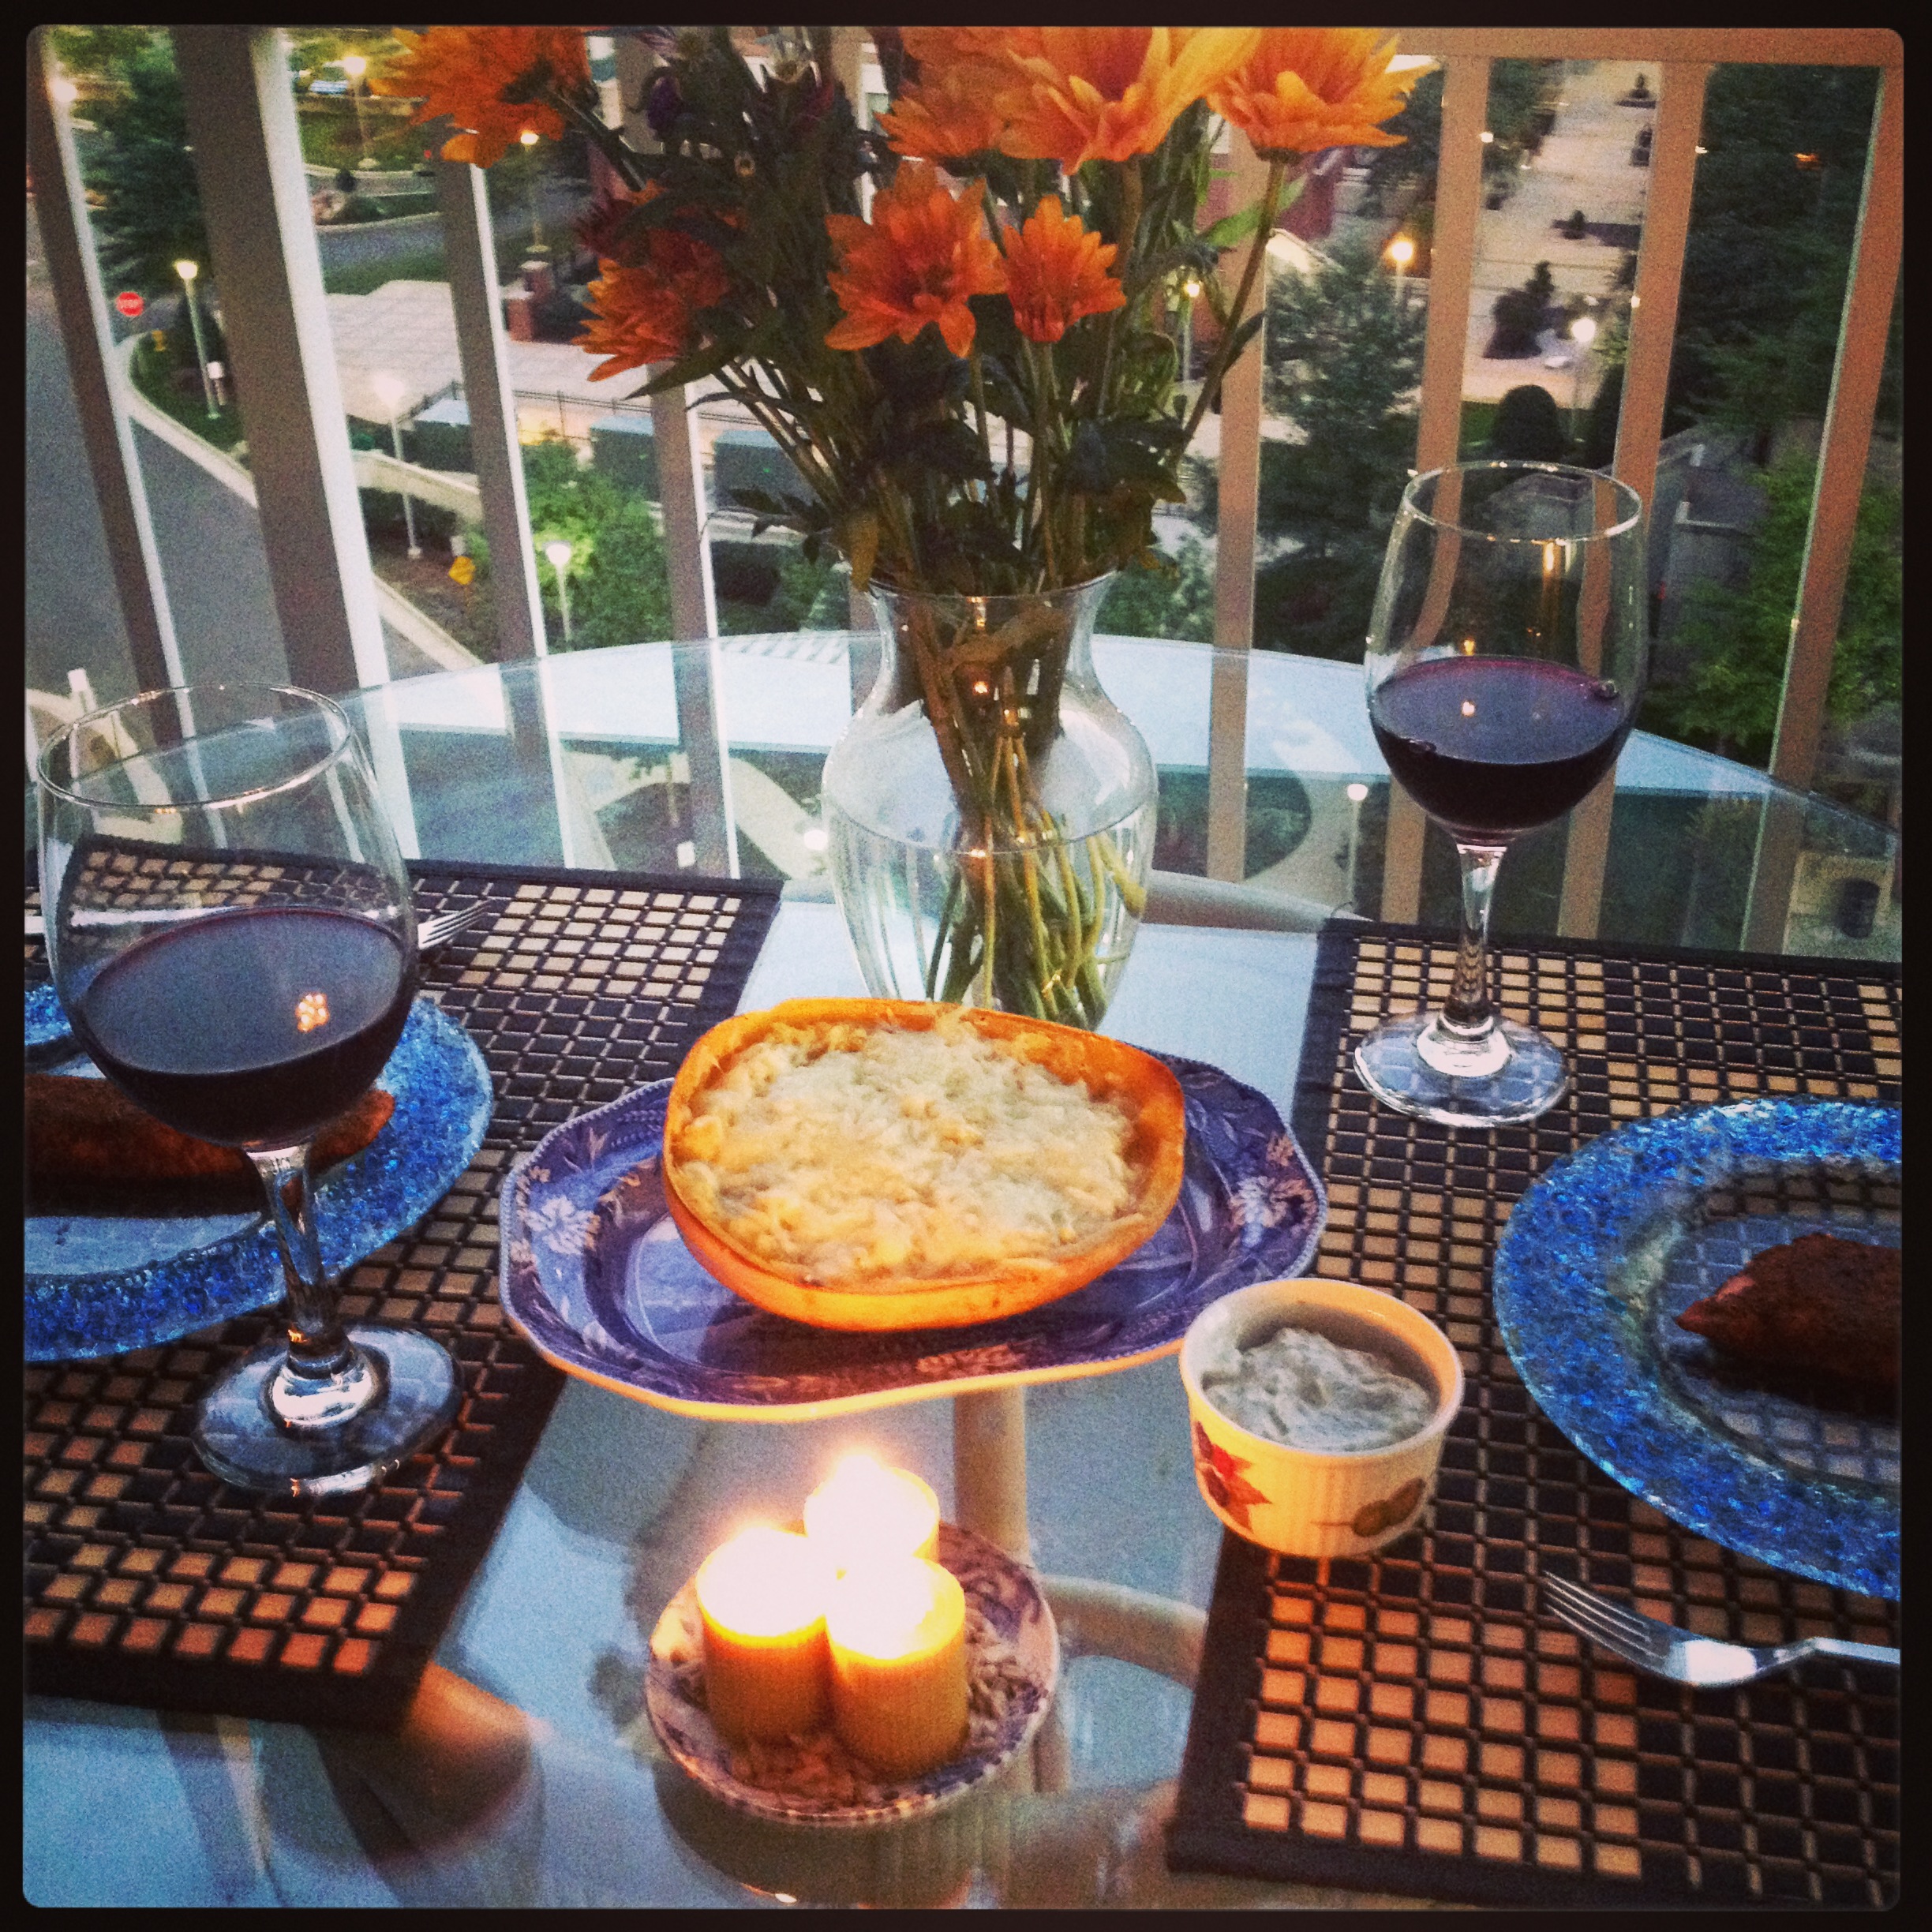
Taylor and I had a little harvest dinner last night. I like to have fish once a week, so this seasoned salmon with homemade dill sauce was perfect.

But the show stopper was the garlic spaghetti squash. I made a believer out of my boyfriend who typically hates squash. So, this gluten free, veggie dish has to be pretty stellar.

It literally did not take me that much time to whip this together. Went to the local Trader Joe’s and bought a $1.99 squash and the rest is culinary history.

You will need: 1 large spaghetti squash, 2 cloves minced garlic, ¼ chopped onion, ¼ cup half and half creamer, ½ cup chicken broth, salt and pepper to taste.

First, cut the squash in half. This might take some time – the exterior is pretty tough. Place the flesh side down on a baking sheet. Set the oven to 375 and bake for 25-30 minutes.

Once the squash is tender, take it out of the oven and let it cool. Then scrape the seeds and darker orange out of the center. With a fork, scrap out the spaghetti like noodle flesh from the side of the squash into a cooking bowl. Let cool.

taylor

Happy Camper!

Splash some olive oil in a frying pan and add in the minced garlic and chopped onion. Sauté for a bit then add in the squash flesh. Slowly add in chicken broth and creamer. Salt and pepper to taste. Let cook for about 15 minutes on the stove!

kimi

I will make this again!

I let the insides cool in the fridge for about an hour. Then placed the spaghetti flesh back in one side of the squash shell and lined the top with fresh mozzarella cheese. I placed the whole thing in the oven at 375 for about 10 minutes to warm up and melt the cheese on top.

Advertisement

Gluten Free Mozzarella Sticks

ImageI am literally jumping for JOY! Finally there are cheese sticks that this gluten free girl can eat. I am a lover of cheese. That might be my diet downfall at times.

However, these GLUTEN FREE BAKED Mozzarella sticks will have you jumping in exuberance too. They are lower in fat (totally baked) and there is no trace of wheat on them.

I paired these with my Zuppa Toscana soup the other night and it was suburb. I thought I was treating myself to a rich Italian dinner without the wheat or the fat!  Let’s get cooking.

You will make these over and over again. My boyfriend (who is not gluten free – asked for them – two nights in a row!) I think that is saying something for these little scrumptious cheese sticks.

You will need: 6 low fat string cheese sticks, 2 cage free eggs, 1 cup gluten free flour, 1 cup baking corn flakes and 2 tbsp of Italian seasoning.

First, cut the string cheeses in half – this should yield 12 baby cheese sticks. Next pour the gluten free flour in one medium soup bowl, the corn flakes in another bowl (mix in the Italian seasoning with the baking flakes) and crack the eggs in a third bowl. You should have three bowls in front of you full of diverse ingredients.

INGREDIANTS

Your bowls should look this this

Take one mini cheese stick and roll it first in the gluten free flour, then in the egg batter and finally in the corn flake, Italian seasoning mixture. Set aside in a separate container – and do this process to the remaining 11 sticks.

Set all of them in the freezer for about 10 minutes. This gives the batter a chance to stick on well.

Preheat the oven to 375 – and place the cheese sticks on a cookie sheet. Bake for about 8 minutes. Watch them frequently because they will cook quickly.

Serve with a bowl of marinara sauce. There you go, baked, gluten free mozzarella sticks. Simple, easy and delicious!

Gluten Free Banana Bread Cookies

ImageIt’s game day. I was just itching for a cookie this afternoon. Cowboys, Redskins both playing today –ah, the excitement! Sometimes you just have to munch on a sweet treat. However, with this awesome recipe, you can munch all you want guilt and gluten free!

I got this recipe from ‘What Runs Lori’ blog. I modified it a little bit – for my taste. I call them Banana Bread Cookies! These cookies are fantastic ladies and gents. You will be making these for parties, events, the office – whatever floats your boat. They are even good for breakfast. A cookie – for breakfast!? That’s right. OK, let’s get cooking.

You will need: 1 cup coconut flour, 1 tsp baking soda, 1/4 tsp baking powder, 1 tsp sea salt, 2 ripe bananas, 1/2 ripe avocado, 1 cup almond milk (or milk of choice), 4 tbsp honey ( I put in an extra one!), 1 tbsp apple cider vinegar, 2 tsp vanilla extract, 2 cage free eggs, 1/4 cup shredded coconut.

game day

Disclaimer: I only root for the Redskins when they do not play the Cowboys. This Texas girl has standards.

You do not have to add coconut shreds, believe me – I know some people are not wild about coconut. You can try cranberries, chocolate chips or maybe walnuts!

First, mix in all the dry ingredients into a little bowl. Put in the flour, coconut shreds, baking powder and soda, sea salt.

In a separate bigger bowl, pour in all the wet ingredients. You might want to mash up the bananas and avocado before adding in the milk, vanilla, honey, apple cider vinegar and eggs. Stir all together.

Combine the dry ingredients with the wet ones. Mix in – make sure there are no green clumps from the avocado. And, preheat the oven to 375.

Make the mixture into little balls – and put them on a cookie sheet. Bake for 20 minutes.

Now, you have some crowd pleasing game day cookies. Guilt and gluten free!

Meals For a Man – Stuffed Bell Peppers

ImageAttention all men! Here is a dish just for you. Well, the ladies love it too – but sometimes it’s hard to please our men when cooking healthy (can I get an amen!?)

Here is a simple stuffed bell pepper recipe that will do the trick. It is low-fat, gluten free and low calorie and is sure to fill you up. I only ate one – and have left overs for tonight!

You will need: 4 green bell peppers, 1 package of ground turkey meat, ½ cup ketchup, 2 tbsp. garlic powder, ½ cup chopped onions, 2 tbsp. Italian seasoning and a pinch of salt and pepper.

The first thing I did was cut the tops of the bell peppers. Here is a simple guide that can instruct you to cut the tops off perfectly. I ran some water in the middle – just to wash out the seeds. I brought a pot of water to boil on the stove and dropped the peppers in there for about 3-5 minutes. Just to get them moist and warm.

In a separate bowl, I emptied out the package of thawed ground turkey meat – and added in first the garlic, Italian seasoning, onions, salt and pepper. With my hands, I rolled all this into the meat mixture. And then took the combo to the skillet. I lightly browned the meat. And then dumped the ketchup on top and mixed it in slowly.

Preheat the oven to 350 – and fill a separate pan with just a line of water at the bottom (enough for the pepper to lightly sit in while baking.) Fill up the hollow peppers with your meat mixture – and then set them in the oven for about 30 minutes.

After 30 minutes, I topped my bell peppers with a bit of Parmesan and a light squirt of ketchup. It gives it a little meatloaf taste. Viola! Serve – everyone, including your man, will love these!

Grab-in-Go Gluten Free Breakfast Muffins

grab in goI made these sweet little pumpkin protein muffins for breakfasts this week. They are gluten free and packed with fiber and protein.

Not to mention, pumpkins keep eyesight sharp, aid in weight loss, may reduce cancer risks, protects the skin, boots your mood and helps beef up your immune system.

This is a neat side show of the health benefits of pumpkins!

Breakfast is an easy meal to skip. However, it’s actually detrimental to skip it. Make about 10 of these little muffins and set them in the fridge. In the morning, grab 2 – and eat them on your morning commute with to-go coffee. Yum.

You will need: ½ regular sized can pumpkin puree, 3 tbsp. ground flax seed, 3 tbsp. chia seeds, 2 tbsps. sweet leaf (or any natural sweetener), 1/2 tbsp. baking powder, 1/2 tbsp. baking soda, 2 scoops whey protein powder, & 1 cap full vanilla extract.

Preheat the oven to 350 and bake these in muffin tins for about 20 – 25 minutes. My recipe yielded about 8 muffins. I would suggest using muffin liners as well. Easy to store and easy to grab in the morning.

Midnight Chickpea Munchies

ImageEver get hungry late into the evening? You have tried your hardest to fend off those ice cream or pretzel cravings – however, waiting too long into the night gets the best of you. You feel your tummy grumble unhappily and you end up giving in and diving into a favorite not so good for you treat.

Believe me; I’ve done that – full admittance here. However, wouldn’t’ it be nice to have a good for you treat in the house, in case those cravings get the best of you?

Well, now you can – midnight chickpea munchies! Baked in the oven for crispiness perfection, these little guys are actually a good option to snack on when you have to have that crunchy treat. And, they are *gluten free.* By now, I hope you are catching on that I really don’t make a dish that isn’t gluten free.

You will need: 2 cans of chickpeas, 2 cap fulls of olive oil, 2 tbsp. cumin, 1 tbsp. chili powder and 1 heaping tbsp. garlic powder. You can also salt and pepper to taste.  

I start with pouring the chickpeas into a mixing bowl and adding all the ingredients in one at a time. Preheat the oven to 350. Line a long baking sheet with foil (I generally spray the foil with cooking spray too) and pour out the seasoned chickpeas onto the pan.

Bake for about 25 minutes – or a little longer for a crunchier taste. Yum! Snack on this at night instead of that fat filled favorite food!

Very Skinny Brownies

ImageShut the front door – a skinny brownie? That’s right – a VERY skinny brownie, in fact. It’s also *gluten free* and packed with loads of fiber. Sounds almost too good to be true; but, it’s true and you too can make this healthy, jaw dropping dessert.

I got this recipe from Undressed Skeleton’s blog. She has the best ideas. Love them. I modified this recipe to my own taste below.

Get cooking – this would be perfect for a little healthy dessert tonight. Satisfies that sweet tooth and fills you up! No more of wanting to eat a whole tray of brownies (I’ve been there!), you’ll be satisfied with 2 (but, no worries, if you are not – these are guilt free – a whopping 2.5 grams of fat each!) Eat one for me!

You will need: 2 bananas, 3 tbsp. ground flax seed, 3 tbsp. chia seeds, 2 tbsps. sweet leaf (or any natural sweetener), 1/2 tbsp. baking powder, 1/2 tbsp. baking soda, 2 scoops whey protein powder, 2 heaping tbsps. cocoa powder & 1 cap full vanilla extract.

First put the bananas in a food processor or blender – blend away! Then pour out this goodness into a mixing bowl. Add all the dry ingredients and stir them in good. Taste the mixture (just for fun, it tastes great!) Mist a pan with cooking spray and empty the brownie mixture in the tin.

Preheat the oven to 350 and pop the very skinny brownies in for about 15 minutes or less.